Menu
View & Approve Timesheets
To view the timesheets submitted, select ‘View & Approve Timesheets’ as shown below:

Below the filters, are a list of Timesheets, matching the filters applied.

Note: You can select multiple weeks to report on. In the ‘Week Ending’ field, select the first date required, then holding down the shift key, select all other Week Ending dates. Each selected Week Ending date will be highlighted in blue.
By default, you will be shown all your Timesheet user’s for the last week ending date. You can choose to change the filters, if you wish to view other filtered Timesheet data.

Timesheet Details
You can view the full details of each Timesheet by clicking on the Week Ending date on each Timesheet.
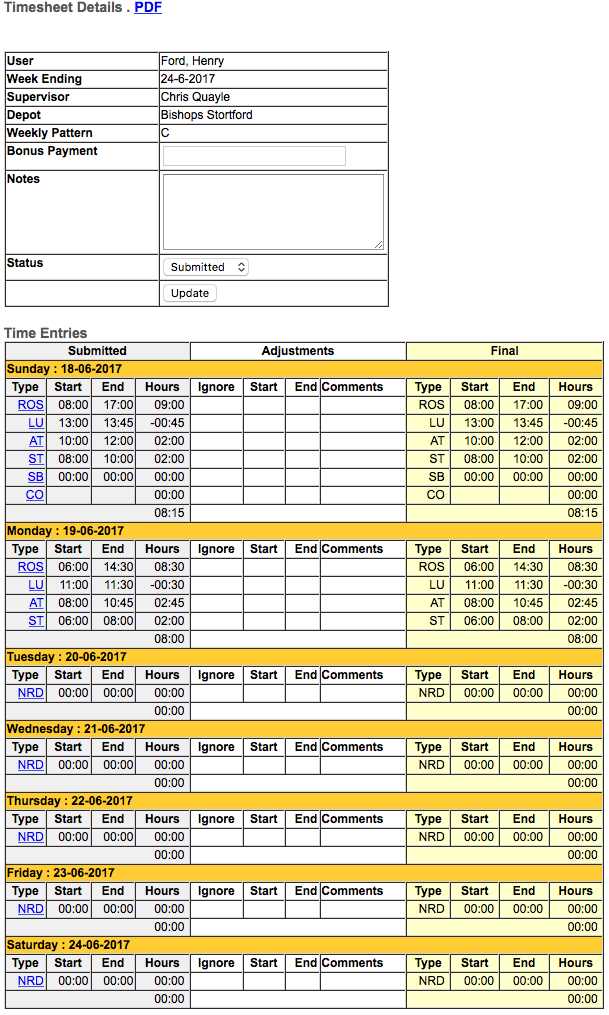
This will expose the Timesheet Details screen, as per the example below:

The Timesheet Details screen allows you to view all submitted Timesheet data, prior to Approval or Rejection.
Adjusting a Timesheet
You can make adjustments to the hours captured, if required.
On each day of the week, the Primary Day Type and Sub Type is captured by the Timesheet Web app user. Should you need to change any of these details, select the ‘Type’ link (underlined text):

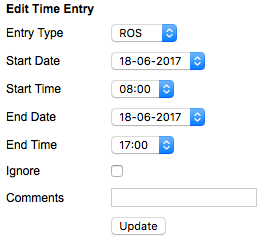
This will expose the ‘Edit Time Entry’ option, where you can adjust the details submitted.
It is mandatory to complete the ‘Comments’ field, to indicate why the change has occurred.
Note: All changes to the Time Entries are logged for audit purposes, and is shown below the Time Entries Grid.
Updating ‘Supervisor’, ‘Depot’ or ‘Weekly Pattern’
Should you need to change the ‘Cadent Supervisor’, ‘Depot’ or ‘Weekly Pattern’, you can make changes to these before you ‘Approve’ a Timesheet.
If you Reject a Timesheet, the Web App user can make the necessary changes to these fields.
After you have ‘Approved’ a Timesheet, these fields are locked. However, the system ‘Super Users’ can make changes to these fields, if necessary.
Approving a Timesheet
To Approve a Timesheet, change the ‘Status’ of the Timesheet to ‘Approved’, and then select the ‘Update’ button.
You will be prompted to ‘Confirm’ the approval by selecting the ‘Confirm’ button. You can cancel the approval status change by selecting ‘Cancel’
Rejecting a Timesheet
You can reject a timesheet if you require the timesheet user to adjust and resubmit the timesheet again.
When a timesheet is rejected, a ‘Rejection Reason’ notes box is shown to enter reasons why the timesheet is rejected. Note: It is mandatory to enter a rejection reason.
If the timesheet data is rejected, an email is automatically triggered from the portal to the email address held for that timesheet owner.
After Rejecting a Timesheet, the Timesheet user can then edit this and resubmit, within the web app.
