Menu
Create New Timesheet
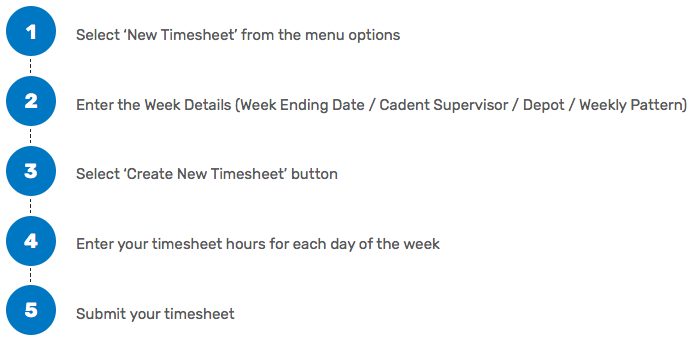
To create your weekly timesheet, there are 5 easy steps to follow:
1 – How to create a new timesheet
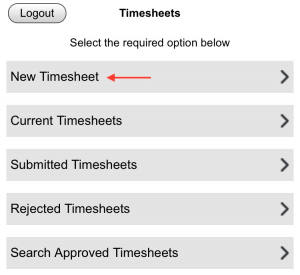
To enter a new timesheet, select ‘New Timesheet’.
2 – Entering Week Details
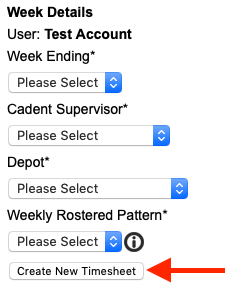
You are required to enter the ‘Week Details’ for each weeks timesheet, and there are 4 dropdown options which are mandatory to complete.
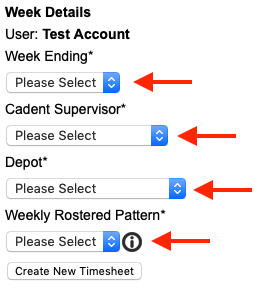
Week Ending: You will need to select the require week ending date from the list available dates.
The available week ending options are the current week ending, and the next 4 week ending dates. A week ending date is always a Saturday date.
Cadent Supervisor: Select your Supervisor from the list of available options. This will be your Supervisor who will approve or reject your timesheet.
Depot: Select the depot you are operating from.
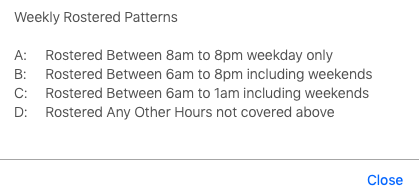
Weekly Rostered Pattern: Select the weekly rostered pattern you are operating under. Next to the ‘Weekly Rostered Pattern’ label is an information ‘i’ icon. Clicking on the information ‘i’ icon popups a box showing the Weekly Rostered Pattern details:
Editing ‘Week Details’
The user can make changes to the following ‘Week Details’ (Cadent Supervisor, Depot and Weekly Pattern) when the Timesheet is in ‘Not Submitted’ and ‘Rejected’ status.
You can therefore adjust the Week Detail options (excluding the Week Ending Date option) up until you have ‘Submitted’ your Timesheet, and thereafter, if the Timesheet has been ‘Rejected’ by your Cadent Supervisor.
3 – Select ‘Create New Timesheet’ button
After you have completed your ‘Week Details’, select the ‘Create New Timesheet’ button, as shown below:
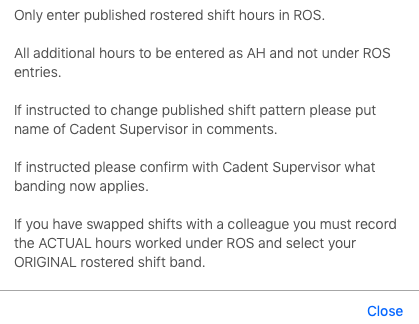
Select ‘Close’ after you have read the notification message, and the options to enter your Timesheets, from Sunday to Saturday (as shown in Step 4 below) will be available.
Note: If you have already submitted a Timesheet for the Week Ending Date selected, you will see a warning message in red text, which reads:
Sorry, you cannot create a new timesheet for this week ending because one has already been created.
If you see this message, select the correct Week Ending Date and select ‘Create New Timesheet’ again.
4 – Entering your daily timesheet hours
After completing the ‘Week Details’ in step 3 above, and selecting the ‘Create New Timesheet’ button, each day of the week will be shown, as below:
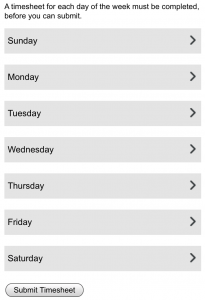
To enter your timesheet hours, click / tap on the required day. In the example below, click or tapping on Sunday will expose the Primary Day Type dropdown.
You will need to complete a timesheet for each day in turn, starting on Sunday. You cannot start your timesheet mid week for instance.
Entering Primary Day Types and Sub Types:
Each day of the week requires a Primary Day Type to be entered, along with the Start Date & Time and End Date & Time.
An example Primary Day Type entry is shown below:
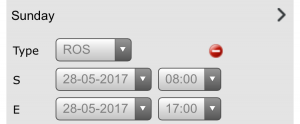
Enter the Day Type from the dropdown options.
You are then required to enter ‘S‘ (Start Date & Hours) and ‘E‘ (End Date & Hours). The Date & Time fields are dropdown options, choose the required date or time. The Start or End Date fields are pre-populated with the associated day for that week, however, if the end ours extend over the midnight, you can change the End date to the following day.
Depending on the Primary Day Type entered, you may need to enter ‘Sub Types’ to complete your day’s hours.
Select the required Primary Day Type below to see the rules that apply, and the Sub Types available.
5 – Submitting your timesheet
When you are ready to submit your Timesheet, select the ‘Submit Timesheet’ button at the bottom of the weeks hours.
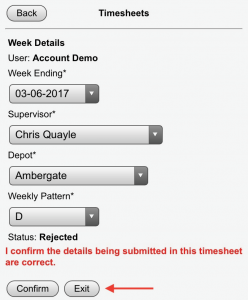
You will be prompted to confirm the details you are submitting are correct. Select ‘Confirm’ to submit your Timesheet, or ‘Exit’ to cancel.
If you are working a Rostered shift, select ‘ROS‘ as the ‘Type’ on the required day of the week.
You will need to enter the following information in the dropdown options for Type ROS:
Type: ROS
S: Date & Time
E: Date & Time
After entering the End Time, a ‘LU‘ Lunch type will automatically be created.
You will need to enter the following information in the dropdown options for Type LU:
S: Date & Time
E: Date & Time
You can change this option to ‘No LU’ if no lunch has been taken.
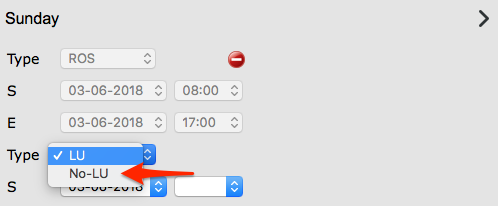
On selection of ‘No LU’, the Start and End times are automatically completed.
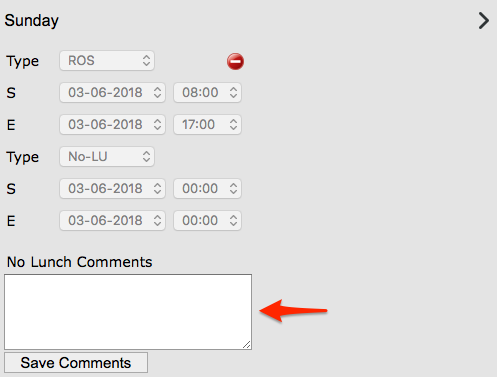
It is important to note, if ‘No LU’ is selected, you must complete the No Lunch comments and ‘Save’.
The following ‘Sub Types’ are available to select:
In addition to entering the ROS and LU types, you have the option to enter the following Sub Types:
AH – Additional Hours
You can enter up to two AH types in a day, which require Start and End Date & Times.
If you enter AH before the start of the ROS (Rostered day), after you complete the start time, the end date & time will automatically populate to the same as the start time of the ROS hours.
You can delete an AH entry independently of other entries for the day.
AT – Attend Training
You can enter one AT type in a day, which require Start and End Date & Times.
If you enter an AT Type, the Start and End Times can span over the ROS hours and any AH hours entered.
You can delete an AT entry independently of other entries for the day.
ST – Sleep Time
You can enter one ST type in a day, which require Start and End Date & Times.
If you enter an ST Type, the Start and End Times can only span over the ROS hours.
You can delete a ST entry independently of other entries for the day.
SB – Stand By
You can enter one SB type in a day. No Start and End Date & Times are required to be input.
You can delete a SB entry independently, however, all CO entries entered will also be deleted.
CO – Call Out (Automatically created if SB has been chosen)
You can enter multiple CO types in a day, which require Start and End Date & Times.
You can delete a CO entry independently of other entries for the day.
Note: It is important to enter your Call Outs (Type CO) in the order you carried out the callout hours.
AL – Annual Leave (Part Day)
You can enter one AL type in a day, which require Start and End Date & Times.
NOTE: YOU MUST BOOK YOUR ROS HOURS BEFORE ENTERING YOUR AL (ANNUAL LEAVE) HOURS
If you enter an AL Type, the Start and End Times should not span over the ROS hours.
You can delete an AL entry independently of other entries for the day.
SL – Sick Leave (Part Day)
You can enter one SL type in a day, which require Start and End Date & Times.
NOTE: YOU MUST BOOK YOUR ROS HOURS BEFORE ENTERING YOUR SL (SICK LEAVE) HOURS
If you enter a SL Type, the Start and End Times should not span over the ROS hours.
You can delete a SL entry independently of other entries for the day.
If you are on a Non Rostered Day , select ‘NRD‘ as the ‘Type’ on the required day of the week.
You don’t have to enter any hours for a Non Rostered Day.
The following ‘Sub Types’ are available to select:
SB – Stand By
You can enter one SB type in a day. No Start and End Date & Times are required to be input.
You can delete a SB entry independently, however, all CO entries entered will also be deleted.
CO – Call Out (Automatically created if SB has been chosen)
You can enter multiple CO types in a day, which require Start and End Date & Times.
You can delete a CO entry independently of other entries for the day.
Note: It is important to enter your Call Outs (Type CO) in the order you carried out the callout hours.
If you are on holiday for the whole shift, select ‘AL’ as the ‘Type’ on the required day of the week.
You will need to enter the following details for the Annual Leave shift:
Type: AL
S: Date & Time
E: Date & Time
You are able to capture ‘SB’ (Standby) and associated ‘CO’ (callout) hours on days where AL (Annual Leave) is taken.
If you are working a Non Working Rostered Day shift, select ‘WNRD‘ as the ‘Type’ on the required day of the week.
You will need to enter the following information in the dropdown options for Type WNRD:
Type: WNRD
S: Date & Time
E: Date & Time
After entering the End Time, a ‘LU‘ Lunch type will automatically be created.
You will need to enter the following information in the dropdown options for Type LU:
S: Date & Time
E: Date & Time
You can change this option to ‘No LU’ if no lunch has been taken.

On selection of ‘No LU’, the Start and End times are automatically completed.

It is important to note, if ‘No LU’ is selected, you must complete the No Lunch comments and ‘Save’.
The following ‘Sub Types’ are available to select:
In addition to entering the WNRD and LU types, you have the option to enter the following Sub Types:
AH – Additional Hours
You can enter up to two AH types in a day, which require Start and End Date & Times.
If you enter AH before the start of the ROS (Rostered day), after you complete the start time, the end date & time will automatically populate to the same as the start time of the ROS hours.
You can delete an AT entry independently of other entries for the day.
AT – Attend Training
You can enter one AT type in a day, which require Start and End Date & Times.
If you enter an AT Type, the Start and End Times can span over the ROS hours and any AHhours entered.
You can delete an AT entry independently of other entries for the day.
ST – Sleep Time
You can enter one ST type in a day, which require Start and End Date & Times.
If you enter an ST Type, the Start and End Times can only span over the ROS hours.
You can delete a ST entry independently of other entries for the day.
SB – Stand By
You can enter one SB type in a day. No Start and End Date & Times are required to be input.
You can delete a SB entry independently, however, all CO entries entered will also be deleted.
CO – Call Out (Automatically created if SB has been chosen)
You can enter multiple CO types in a day, which require Start and End Date & Times.
You can delete a CO entry independently of other entries for the day.
If you are off sick for the whole day, select ‘SL’ as the ‘Type’ on the required day of the week.
You will need to enter the following details for the Sick Leave shift:
Type: SL
S: Date & Time
E: Date & Time
If you are suspended for the shift, select ‘SUS’ as the ‘Type’ on the required day of the week.
You will need to enter the following details for the suspended shift:
Type: SUS
S: Date & Time
E: Date & Time
If you are unable to work, for example, you are on compassionate leave or paternity leave, select ‘OA’ as the ‘Type’ on the required day of the week.
You will need to enter the following details for the Other Absence shift:
Type: OA
S: Date & Time
E: Date & Time
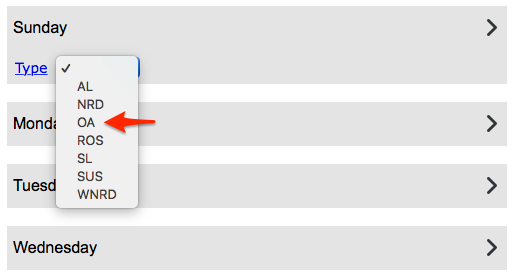
Please note: If ‘OA’ is selected, it is mandatory to capture and ‘Save’ comments.
